

A lot of people are interested in making their own skincare products, and natural vitamin C serums are one of the first things many people try. Vitamin C is known for its antioxidant power, its skin-brightening effects, and its role in keeping skin looking firm and youthful by supporting collagen production. If you want that radiant, fresh look for your skin, making your own vitamin C serum at home is a fun and practical way to get started with DIY skincare.
I’m going to walk you through my process for making a natural vitamin C serum using essential oils that are gentle and skin safe. You’ll get a full ingredients list, clear instructions, stability tips, and some safety notes I always follow myself. Whether you’re a total beginner or already love mixing your own products, this guide has everything you need for a brighter, healthier glow.
Safety Note: Vitamin C is a potent active ingredient. Always perform a patch test on a small area of skin (like your inner arm) and wait 24 hours before applying the serum to your face.
Why Use Vitamin C in Your Skin Routine?
Vitamin C (L ascorbic acid) does some pretty impressive things for the skin. It’s well loved by dermatologists and skincare buffs alike because it helps:
- Protect against environmental stress (like sun and pollution) thanks to antioxidant properties
- Reduce the look of dark spots and uneven skin tone by brightening dull areas
- Support skin’s firmness by helping your body make natural collagen
- Improve overall texture and help with post acne marks
This is why you’ll see vitamin C serums everywhere in shops, but making your own lets you skip preservatives, tweak the scent, and know exactly what you’re putting on your face. By making it at home, you’re in total control of the ingredients, and you can customize it to fit your own skincare needs or sensitivities. Plus, experimenting with your own batches can be really satisfying, not to mention cost effective in the long run.
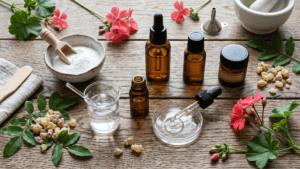
Your Ingredient List for Natural Vitamin C Serum
When making a serum, I always stick to ingredients that are proven safe and play nicely together. Here’s what I recommend for a simple, beginner friendly batch:
- L ascorbic acid powder (pure vitamin C)—effective and water soluble
- Distilled water—keeps things clean and stable
- Vegetable glycerin—adds hydration and creates a smooth texture
- Skinsafe essential oils (for scent and extra benefits):
- Frankincense—calming and great for hydration
- Geranium—balances and soothes the skin
- Avoid citrus essential oils (like lemon or orange) because some are phototoxic and not good for daytime use on skin
- Small amber glass dropper bottle—protects the serum from light
- pH test strips—optional, but useful if you want to get extra precise and help keep your serum stable
- Mini whisk, small funnel, glass beaker or measuring cup
Choosing high quality ingredients ensures your final serum works well without causing unwanted irritation. Wherever possible, go for organic options and always check the label if you have any allergies or sensitivities. And remember, you can always adjust the kind of oil or ratios once you get the hang of making a basic batch.
Step by Step: Mixing Your Vitamin C Serum
1. Clean and Prep Your Workspace
- Wash your hands and sanitize all your tools and bottles. Vitamin C is sensitive to water, so a clean setup is super important for a fresh serum. Take a few minutes to wipe down surfaces and ensure everything you use is totally clean. This helps your serum stay fresh and lowers the risk of introducing bacteria.
2. Measure Your Ingredients
- For a 20ml batch (about two thirds of an ounce):
- 1/2 teaspoon L ascorbic acid powder (about 2 grams)
- 1 tablespoon distilled water (about 15 ml)
- 1 teaspoon vegetable glycerin (about 5 ml)
- 2-4 drops of essential oil (total); mix and match but keep it low since essential oils are strong
3. Mix the Vitamin C
- Pour the distilled water into your glass beaker or small bowl.
- Add the L ascorbic acid powder and stir well with a mini whisk (or glass stirring rod). Keep stirring until it’s completely dissolved. It shouldn’t feel gritty or look cloudy. The clearer the better. Patience is key here, as a little extra stirring pays off in smoother results.
4. Add Glycerin and Essential Oils
- Drizzle the glycerin into the vitamin C solution and stir again. This gives your serum a smooth, slightly thicker texture that goes on nicely and helps lock in moisture.
- Add your chosen essential oils—just two to four drops total is enough for a nice scent and skin benefits without irritating your face.
5. Test and Adjust (Optional but Helpful)
- If you have pH test strips, dip one in your serum. Vitamin C serums work best at a pH between 2.5 and 3.5. If it’s much higher (less acidic), it won’t be as effective. If it’s much lower, it might irritate sensitive skin. Getting your serum within this range helps you get the best results while staying gentle on your face.
6. Bottle Your Serum
- Using a small funnel, carefully pour your finished serum into a clean amber glass dropper bottle. The dark glass helps prevent light from breaking down the vitamin C. Make sure the bottle is totally dry before you add the serum.
Your serum is ready for use. A fresh batch like this usually lasts up to two weeks in the fridge. Be sure to label the bottle with the date you made it, so you can keep track of freshness.
Stability Tips to Prevent Oxidation
- Vitamin C is super sensitive to air, water, and light. When it oxidizes, it turns yellow or brown (and loses most of its benefit). Here are a few things I always do to help keep it fresh:
- Bottle in an amber or cobalt blue glass container (never clear plastic).
- Store in the fridge when you’re not using it—colder temps slow down oxidation and help keep your serum potent.
- Keep the bottle tightly closed and avoid direct sunlight or warm spots, even while using it daily.
- Mix only enough for a week or two at a time so you use it up before it spoils — smaller batches are safer and more effective.
- Check the serum’s color every time you use it; if it’s yellow or brown, it’s time to toss and make a new batch, as oxidized serum won’t give your skin the same boost.
By following these smart storage tips, you’ll get more benefit from each batch and avoid wasting ingredients.
Safety Notes for DIY Vitamin C Serums
- Patch Test. Always swipe a tiny bit on your jawline or behind your ear before slathering it on your face. Wait 24 hours and see if there’s any redness, itchiness, or stinging.
- Avoid Phototoxic Essential Oils. Citrus oils like bergamot, lemon, and sweet orange can increase skin’s sensitivity to sunlight, which isn’t what you want in a daily serum. Stick with nonphototoxic oils like frankincense, geranium, or lavender.
- Don’t Use on Broken or Irritated Skin. Vitamin C is acidic by nature and can sting if you have cuts, recent exfoliation, or active breakouts. Use on healthy, intact skin only.
- Start Slow. If you’ve never used vitamin C serums before, apply every other night until your skin adjusts. Move up to daily if your skin likes it. People with sensitive skin should always introduce new products gradually to avoid unpleasant reactions.
Common Questions & Troubleshooting
The serum feels gritty. What should I do?
Sometimes vitamin C powder doesn’t dissolve if the water is too cold or you add too much powder. Try warming the water a bit and stirring longer, or use slightly less powder next time. The key is to keep stirring until the mix is totally clear before you proceed.
My serum changed color after a few days. Is it still okay?
If your serum turns yellow or brown, it’s oxidized and should be replaced. Storing in the fridge and using dark glass bottles helps slow this down, but homemade vitamin C serums are meant to be used up quickly for best results.
Can I use essential oils for fragrance only?
Skinsafe essential oils like frankincense and geranium do add soft fragrance, but they also offer skin calming benefits. Always follow safety guidelines for dilution to avoid irritation. While fragrance adds a lovely touch, it’s the added skin perks that make these oils worthwhile in your serum blend.
Quick Recap & Your Next Steps
Making your own natural vitamin C serum is a rewarding way to customize your skincare. You get antioxidant rich, brightening ingredients, a fresh burst of hydration, and the soothing power of aromatherapy with gentle essential oils. Remember to follow the measurements, store your batch in the fridge, and always patch test if you’re new to DIY products.
- Gather the ingredients and sanitize your tools before you start mixing.
- Mix and dissolve the vitamin C powder fully in distilled water for the right consistency.
- Add glycerin and essential oils, then bottle it in amber glass to protect your serum.
- Keep a close eye on color and scent; use up each batch within 1-2 weeks for best effect.
If you try this out and love the results, you can adjust the essential oils or tweak the formula as you get more confident. Enjoy the glow and drop any questions or tips in the comments—I’m always happy to help. With practice, you’ll come up with your own little tricks, making each batch even more personalized for your skin’s unique needs.

I would really like to start making my own skincare at home. For someone completely new to DIY skincare, what’s the biggest mistake to avoid when making a vitamin C serum at home? I know I should use it up quickly and keep it in dark glass bottles. Great article by the way, thanks for the tips!
Thank you so much for your kind words, and I’m really glad you found the article helpful!
You’re already thinking about two of the most important things—using the serum quickly and storing it in dark glass bottles—so you’re definitely off to a great start.
For beginners, one of the biggest mistakes to avoid when making a DIY vitamin C serum is using a concentration that is too strong too quickly. Vitamin C can be very effective, but if the formula is too concentrated or not properly balanced, it may irritate the skin, especially for sensitive skin types.
Another common issue is oxidation. If the serum starts turning dark yellow or orange, that usually means the vitamin C has oxidized and is no longer as effective. Making small batches and storing them properly really helps with this.
I’d also recommend keeping the ingredient list simple at first and always patch testing before regular use. Starting with a gentle concentration and observing how your skin reacts is the safest and most effective approach.
It’s wonderful that you’re interested in making your own skincare—DIY routines can be such a rewarding and intentional way to care for your skin!
Thank you, this is great, an affordable way to get Vitamin C onto your skin. I find this is highly overpriced, and I am sure that this is the reason a lot of people don’t buy Vitamin C Serum. Although I do love the way it makes my skin feel.
I am going to try your recipe to make it at home, provided I can get a good vitamin C powder. Of course making it yourself you will need to be double careful with measurements and make sure to do a patch test on your skin first, especially with the essential oils.
Thank you so much for your thoughtful comment I’m really glad you found the idea helpful and practical!
You’re absolutely right, Vitamin C serums can be quite expensive, and that can definitely discourage people from using them regularly even though they love the results. Making a simple version at home can be a more affordable and customizable alternative, as long as it’s done carefully.
You’ve also highlighted two very important points: precise measurements and patch testing. With active ingredients like Vitamin C (and especially if any essential oils are included), small differences in concentration can affect how your skin responds, so starting gently is always the safest approach.
I’m excited for you to try it, and I hope it works well for your skin. Just remember to keep batches small and store it properly to maintain freshness and effectiveness.
Thank you again for sharing your experience!
This is a really clear and beginner-friendly guide to DIY skincare. I appreciate how you break down each step of formulating a Vitamin C serum in a practical way while still emphasizing safety. The reminders about oxidation and proper storage are especially useful, since that’s often where homemade serums fall short. I also like that you caution against phototoxic essential oils and encourage patch testing, those details make the guide more responsible and trustworthy. The inclusion of simple measurements and tips for adjusting batches makes it approachable for first-timers. One suggestion might be to briefly mention alternative forms of vitamin C for sensitive skin. Overall, this is an informative and well-balanced post that empowers readers to experiment safely while understanding the science behind their applications.
Thank you so much for your thoughtful and detailed feedback I truly appreciate it!
I’m really glad you found the guide clear, practical, and beginner-friendly. DIY Vitamin C serums can be incredibly rewarding to make, but as you mentioned, details like oxidation, proper storage, and skin safety are so important for both effectiveness and overall skin health.
I also appreciate your point about mentioning alternative forms of Vitamin C for sensitive skin that’s actually a great suggestion. Gentler derivatives can sometimes be a better starting point for people who are more reactive or new to active skincare ingredients.
It means a lot that you noticed the emphasis on responsible formulation practices like patch testing and avoiding potentially irritating ingredients. My goal is always to help readers feel confident experimenting while still understanding the science and safety behind what they’re applying to their skin.
Thank you again for sharing such valuable insight and encouragement!
This is a really helpful guide for anyone wanting to start making their own skincare products naturally. As a soap maker, I always tell people that working with active ingredients like vitamin C and essential oils takes a little extra care, especially when it comes to freshness and skin sensitivity. I’m glad you mentioned patch testing and avoiding phototoxic oils because that’s something a lot of beginners miss. I also love the reminder to make small batches since homemade vitamin C serums can oxidize so quickly. Great beginner-friendly breakdown with lots of useful safety tips
Thank you so much for your thoughtful comment—it really means a lot coming from someone with hands-on soap-making experience!
You’re absolutely right that working with active ingredients like Vitamin C and essential oils requires a bit more care and attention than many beginners initially realize. Freshness, stability, and skin sensitivity all play a huge role in whether a DIY formula is both safe and effective.
I’m really glad the points about patch testing, phototoxic essential oils, and small-batch formulation stood out to you. Those are exactly the kinds of details that help people avoid common mistakes—especially with ingredients that can oxidize or become unstable quickly like Vitamin C.
It’s also great to hear your perspective as a soap maker, because you already understand how important proper formulation and handling are when working with active ingredients. That kind of experience really helps reinforce the importance of safe DIY practices.
Thank you again for sharing your insights and for such a thoughtful contribution to the discussion!
I liked that you explained the role of essential oils carefully instead of treating them as automatically beneficial in every situation, especially since some people can react pretty strongly to certain oils on their skin.
How important is the storage method for a homemade vitamin C serum? I’ve heard vitamin C can lose effectiveness pretty quickly when exposed to light or air. Also, do you think DIY serums can realistically match the stability and effectiveness of professionally formulated products, or are they better viewed as a simpler natural alternative?
Thank you for such a thoughtful and balanced comment. You brought up some really important points, especially about essential oils and vitamin C stability.
You’re absolutely right that essential oils are not automatically suitable for everyone. Even natural ingredients can sometimes trigger irritation or sensitivity, particularly when used in high concentrations or on reactive skin. That’s why careful dilution, patch testing, and understanding each oil’s properties are so important in DIY skincare.
Storage is also extremely important for homemade vitamin C serums because vitamin C is naturally unstable and can oxidize fairly quickly when exposed to light, air, heat, or moisture. Using dark amber or opaque bottles, minimizing air exposure, storing the serum in a cool place, and making small batches can all help slow oxidation and maintain effectiveness for longer. A serum that starts turning dark yellow or orange is often a sign that the vitamin C has begun degrading.
As for DIY versus professionally formulated serums, I think homemade versions are best viewed as a simpler and more customizable alternative rather than a direct replacement for highly stabilized commercial formulations. Professional products often use advanced stabilization systems, controlled pH balancing, airless packaging, and specialized vitamin C derivatives that can maintain potency much longer and improve absorption.
That said, DIY serums can still be very useful for people who enjoy natural skincare, want ingredient control, or prefer fresh small-batch formulations—as long as expectations are realistic and proper handling practices are followed.
I really appreciate your thoughtful questions and balanced perspective on the topic!
I’ve been trying to pay more attention to natural skincare lately, so this article caught my attention right away. A lot of store-bought serums can get really expensive, especially when they contain ingredients people don’t fully understand. I like that you explained things in a beginner-friendly way because DIY skincare can feel intimidating at first. The section about essential oils was especially helpful since many people don’t realize some oils can irritate sensitive skin if used incorrectly. Have you personally noticed better results with homemade Vitamin C serums compared to commercial brands?
Thank you so much for your thoughtful comment!
I’m really glad you found the guide helpful and beginner-friendly. You’re right DIY skincare can feel intimidating at first, especially when compared to commercial serums that are already fully formulated and tested.
Homemade Vitamin C serums can work for some people, but they’re usually best seen as a fresh, short-term option rather than a direct replacement for commercial products, which tend to be more stable and consistent.
Thanks again for your kind feedback!
I really enjoyed this post. I have always been interested in more natural skincare options, but honestly, making a vitamin C serum sounded a bit intimidating before reading this. I liked how you broke everything down step by step and included tips on storage and oxidation, because I would not have known that homemade batches need to stay fresh and be used quickly. The safety section was also really helpful. I was curious, have you found that one essential oil works better than others for sensitive skin?
Thank you so much for your thoughtful comment! I’m really glad the step-by-step explanations and storage tips helped make DIY vitamin C serum feel less intimidating.
For sensitive skin, I usually recommend being very cautious with essential oils in facial products because even gentle ones can sometimes cause irritation. If someone does want to use one, lavender or chamomile essential oil are often considered milder options when properly diluted, but patch testing is till very important.
In many cases, keeping the formula simple with fewer added ingredients is actually the safest approach for sensitive skin.